Optout setup
|
Optout setups allow your subscribers to unsubscribe automatically from your subscriberlist. Please note: Requirement of functionality is to create dialog-mailings (according to module-selection) for optout confirmation or farewell. They need to be 'activated'. Otherwise this mailings will be missed in list box while adaption of your potout setup. Created optout setups can be 'opend' afterwards for editing, 'moving' to another folder or 'deleting'. If you have moved an opout setup into another folder, click 'open folder' to get into. Create new optout setup |
|
|
|
Enter a name and an optional description. Choose the 'mode' (important). The following modes are supported by 'mailingpoint': Double-optout with confirmation e-mail: after unsubscribe from your website or your newsletter a confirmation email will be send automatically. Optout will be activated after clicking the confirmation link in this email. After successful unsubscription the former subscriber will get a last email („You unsubscribed successfully of our newsletter.“) Double Optout: Like described before, but without sending of a „successful unsubscription“ e-mail Confirmed Opt-Out (recommended): After unsubsubscription on your website or in your newsletter a „successful unsubscription“ email will be sended immediately. Single Optout: No e-mails will be send. There just will be a message in your browser, that optout was successfull. In Tab 'advanced settings' you can deposit your e-mail address in field 'e-mail forwarding', to be informed about unsubscriptions. Tab 'subscriberlists': Choose your favorite subscriberlist(s), where all unsubscriptions should be logged out. Select the subscriberfields, which should be filled out by your subscribers in tab 'Form'. After clicking 'create form fields' a popup appears, where you can choose and add subscriber fields to your form. Click 'sort formular fields' to arrange your fields. Click 'test form' to open a new tab in your browser with a preview of your form. Source Code of your website is genereated by 'mailingpoint' by clicking 'Formular soruce code'. A popup appears with your source code. Last tab: Dialog pages |
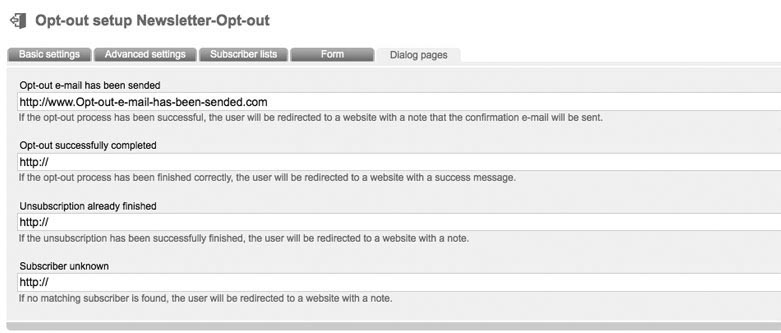 |
Short explanation: After successfully or faulty input your subscriber will be leaded to an appropriate answer-page, e.g. with a shortly message like „Your subscription was successfull“. Don't fill out those fields if you want to use the 'mailingpoint' standart-dialog-pages. If you want to display your own dialog-pages, enter the urls of your websites in the certain fields.
|
