|
|
 |
The basic structure of a document is structured as follows: |
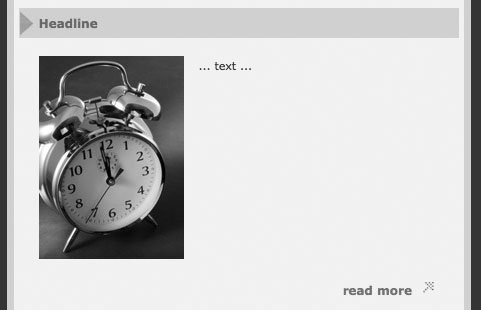
| ------------------------------------------------------------------------------------------------- [CONTAINER name='artikel'] [ELEMENT name='articel_text'] [INDEXITEM]<a href="[INDEXITEMANCHOR]"> [INDEXITEMNAME]</a>[/INDEXITEM] [ELEMENTTOOLS][ANCHOR][UPDATE][REMOVE][/ELEMENTTOOLS] [BLOCK name='image' edit='true'] <a href="[INPUT name='Link URL' type='char' default='']"> <img src="[INPUT name='image' type='image' default='http://www.youredomain.de/images/links.jpg']" width="[INPUT name='Bildbreite_max145px' type='image' default='145']" border="0" /> </a> [/BLOCK] [BLOCK name='Headline'] [INPUT name='Headline' type='char' default='Headline' index='true'] [/BLOCK] [BLOCK name='text'] [INPUT name='text' type='text' default='... text ...'] [/BLOCK] [BLOCK name='Link'] <a href="[INPUT name='Link' type='url' default='http://www.link.de']"> [INPUT name='Linktext' type='char' default='Webpage'] <img src="http://www.IhreDomain.de/images/arrow.jpg" width="19" height="18" border="0" /> </a> [/BLOCK] [/ELEMENT] [CONTAINERTOOLS][CEATE][SORT][/CONTAINERTOOLS] [/CONTAINER] ------------------------------------------------------------------------------------------------- |
|
The container encloses the dynamic article-sector and must to be created necessarily at the beginning. The end-tag of a container means the end of the dynamic sector. In space of this container you can create and sort your elements. An element means for example an article with an image on the rightend side, or an article without an image or just an image. Open and close elements with the element-tags. To realize the input of content, every element needs as many as one block. Contents of an article can be sorted and edited seperately with the help of blocks. Depending on the desired content, input fields can exist of different types:
Don't forget saving and closing of all open blocks, elements and containers after placing all inputfields. |
 |
|
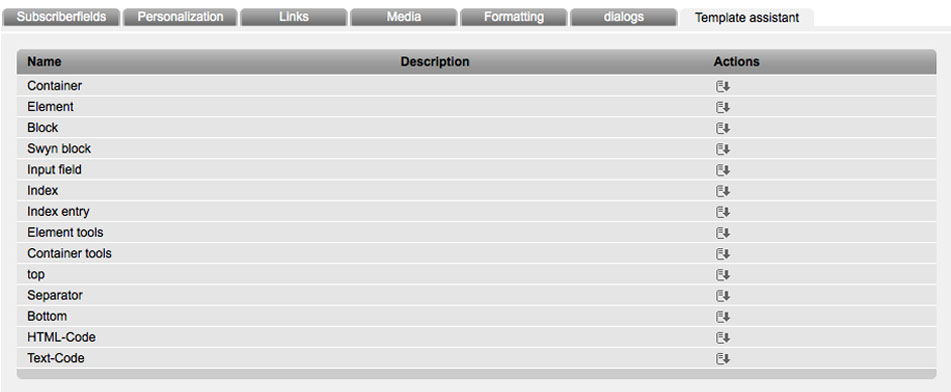
You can chose and place all described placeholders in mailingpoint with the „input assistance“ (last tab: template assistance). Tab HTML Preview:HTML preview shows your created basic layout. So you can proof the structure of your elements and contents. Tab Text inputThis tab gots the function, that your newsletter can also be shown just in textformat (p.e. For email clients, who don't support multipart-formats). Here you need the same placeholders like before, but without html source code. |
------------------------------------------------------------------------------------------------- [CONTAINER name='article'] [ELEMENT name='article_text'] [INDEXITEM][INDEXITEMANCHOR][INDEXITEMNAME][/INDEXITEM] [BLOCK name='headline'] [INPUT name='headline' type='char' default='headline' index='true'] [/BLOCK] [BLOCK name='text'] [INPUT name='text' type='text' default='... text ...'] [/BLOCK] [BLOCK name='Link'] [INPUT name='Linktext' type='url' default='Webpage'] [INPUT name='Linkt' type='char' default='http://www.link.de'] [/BLOCK] [/ELEMENT] [/CONTAINER] ------------------------------------------------------------------------------------------------- |
|
Images aren't displayed in the textpart of a newsletter, so you don't have to populate those image-inputs compulsory into the textpart. If you still want to incluce those image-inputs into your textpart, there just will be shown the url of the image in the text. Just place fixed elements of your newsletter between the placeholders. Don't forget to save your text input. Tab Text preview:Here you can check your text and the structure of your different inputfields. For further comprehension:With Element- and Container-Tools you have the possibility to define icons in your E-Mail-Template for editing, creating, sorting and removing your elements in your newsletter. They are just displayed in editing-mode of your html-email. |
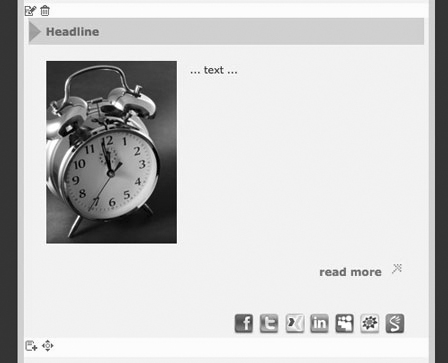 |
List of content:If you want to merge the contents of your mailing in an index, you can either enter it manually or generate it automatically in the template. Such an index can be created for all elements in one container and is clearly defined automatically to the content of your newsletter. First you have to define your index and the attached container at the part of your template - where the index should be placed – like this: [INDEX name='contants' container='article'] ... [/INDEX] The single items of your index are defined in their respective elements by the Indexitem tag. [ELEMENT name='article_text'] [INDEXITEM][INDEXITEMANCHOR][INDEXITEMNAME][/INDEXITEM] ... [/ELEMENT] The name of the element ist used by default as indexitem. If you want to use an extra indexitem, which is not a content of your element, you can create it analogically with a new inputfield. You just have to set the attribute index='true' in your field. [INPUT name='headline' ... index='true']SWYN-function:For the integration of 'social media function' you first have to define a block element as follows: The block contains the individual social network provider, the following are defined in the source code: For example: [TWITTER img=''http://www.Domain.de/images/twitter.jpg' width='24' height='24'] [XING img=''http://www.Domain.de/images/xing.jpg' width='24' height='24' ] [LINKEDIN img=''http://www.Domain.de/images/linkedin.jpg' width='24' height='24'] [MYSPACE img=''http://www.Domain.de/images/my.spacejpg' width='24' height='24'] [STUDIVZ img=''http://www.Domain.de/images/studivz.jpg' width='24' height='24' ] [SPREADLY img='http://www.Domain.de/images/spreadly.jpg' width='24' height='24'] [GPLUS img='http://www.IhreDomain.de/images/spreadly.jpg' width='24' height='24'] Note: You must include your own images as icons in each state (img) and the right size.Examplae for RSS: [CONTAINER name='container_1' feed-url='http://www.mein-rss-feed.de/feed/'] |
Email